Well pump maintenance is the routine care that keeps your home’s water supply clean, consistent, and reliable, and most homeowners skip it entirely. According to the National Ground Water Association, 80% of well owners have never had a maintenance inspection. That’s a costly gamble.
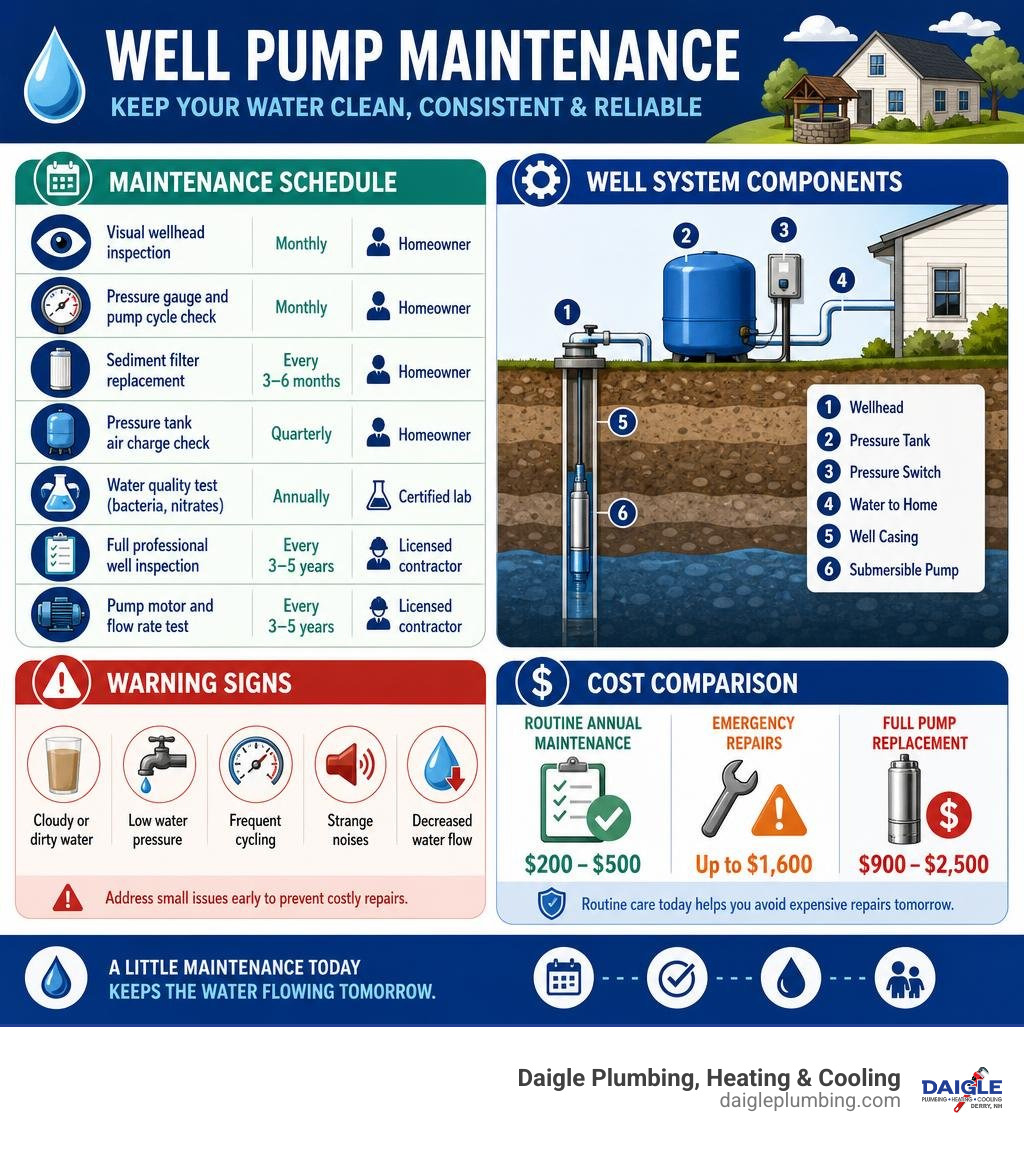
Here’s what basic well pump maintenance looks like at a glance:
| Task | Frequency | Who Does It |
|---|---|---|
| Visual wellhead inspection | Monthly | Homeowner |
| Pressure gauge and pump cycle check | Monthly | Homeowner |
| Sediment filter replacement | Every 3-6 months | Homeowner |
| Pressure tank air charge check | Quarterly | Homeowner |
| Water quality test (bacteria, nitrates) | Annually | Certified lab |
| Full professional well inspection | Every 3-5 years | Licensed contractor |
| Pump motor and flow rate test | Every 3-5 years | Licensed contractor |
Skipping these steps doesn’t save money. It costs money. Routine annual maintenance runs $200 to $500. Emergency repairs can top $1,600. A full pump replacement? Anywhere from $900 to $2,500.
The good news: most well pump problems are preventable. A small amount of consistent attention goes a long way toward keeping your water flowing and your repair bills low.
At Daigle Plumbing, Heating & Cooling, our licensed team has years of hands-on experience with plumbing systems, including well pump maintenance. In this guide, we’ll walk you through everything you need to know, from monthly DIY checks to knowing when it’s time to call a pro.
The Ultimate Checklist for Well Pump Maintenance
To keep your water system operating at peak performance, you need a proactive game plan. Think of your well system like a car: if you wait for the engine to seize before checking the oil, you are looking at a massive bill. The same is true for your well pump. By establishing a consistent maintenance routine, you can extend the life of your equipment and protect your family’s drinking water.
A reliable maintenance strategy combines quick, regular checks that you can do yourself with professional service when things get highly technical. If you notice unusual cycling, low water pressure, or loss of water, our well pump installation and repair team can inspect the system, test the pump, and recommend the right fix.
Our broader plumbing services also support the parts of your home that work alongside the well system, including fixtures, pipes, valves, filtration, and pressure-related plumbing concerns.
Monthly and Quarterly Well Pump Maintenance Tasks
Your monthly and quarterly routine is your first line of defense. These tasks are simple, take less than fifteen minutes, and require no advanced technical expertise.
- Check the wellhead clearance: Walk out to your yard and inspect the area surrounding your wellhead. Maintain a strict 10-foot clearance zone free of leaves, mulch, weeds, and debris. Never store fertilizers, pesticides, paint, or automotive fluids within 50 feet of the wellhead.
- Inspect the casing and cap: Check the physical condition of your well casing. It should extend at least 12 inches above the ground, and the surrounding soil should slope downhill away from the casing to prevent surface runoff from pooling. Look for cracks, holes, or signs of physical damage, such as from a lawnmower. Ensure the sanitary well cap is securely bolted and the vent screen is intact to keep bugs, rodents, and dirt out.
- Monitor the pressure gauge and pump cycles: Head inside to your pressure tank and watch the pressure gauge while water is running. Note the “cut-in” pressure, when the pump turns on, and the “cut-off” pressure, when it turns off. A healthy system should run for at least 60 seconds per cycle. If your pump is clicking on and off every 10 to 30 seconds, it is short-cycling, which will rapidly burn out the motor.
- Replace the sediment filter: If your home uses a whole-house sediment filter to protect your plumbing and appliances, inspect the cartridge every 3 to 6 months. A clogged filter restricts water flow, forcing your well pump to work harder and consume more energy.
Annual Well Pump Maintenance and Professional Inspections
While monthly visual checks are incredibly valuable, some aspects of your well system require specialized tools and expert training. Once a year, you should perform water quality testing and consider scheduling a professional inspection.
- Annual water quality testing: Your well water may look, smell, and taste perfectly fine, but invisible contaminants can still be present. The National Ground Water Association and the CDC recommend testing your water at least once a year for coliform bacteria, E. coli, and nitrates. In New Hampshire, our unique granite geology means we also have localized risks for arsenic, radon, and beryllium. Testing annually at a certified lab typically costs between $100 and $300, and it is the only way to guarantee your water is safe to drink.
- Professional well inspections: Every 3 to 5 years, or annually if your well is over 15 years old, you should hire a licensed water well contractor. A professional inspection, costing between $250 and $500, covers a comprehensive physical and operational diagnostic. This includes a flow rate and drawdown test, checking the pump motor’s performance, amp draw, voltage, and grounding, inspecting the pressure switch contacts for corrosion, and conducting a sanitary equipment check.
If routine checks reveal pressure changes, odd pump cycles, or unreliable water flow, our blog on well pump repair signs and solutions explains the symptoms homeowners should take seriously and how those signs often connect to pump, tank, or supply-line problems.
Managing Your Pressure Tank to Prevent Pump Short-Cycling
Most homeowners assume that if they have water pressure issues, the well pump itself is failing. However, in our experience servicing homes throughout Derry, NH, and the surrounding areas, we find that most pump problems are actually pressure tank problems in disguise.
Your pressure tank acts as a buffer for your water system. It contains a flexible rubber bladder surrounded by pressurized air. When you turn on a faucet, the compressed air pushes water out of the tank and into your pipes. This prevents the well pump from having to turn on every single time you rinse a cup or flush a toilet.
If the pressure tank loses its air charge or the internal bladder ruptures, the tank becomes “waterlogged.” Without the air cushion to provide resistance, the system experiences rapid pressure drops, causing the well pump to turn on and off constantly, a destructive process known as short-cycling. Short-cycling is the number one cause of premature pump motor failure.
How to Check and Adjust Pressure Tank Air Charge
Checking your pressure tank’s air charge is one of the most important DIY tasks you can perform to save your pump from an early grave. We recommend checking this quarterly.
Here is how to do it safely step-by-step:
- Find your system’s operating pressures: Watch your pressure gauge while water is running to identify your pump’s “cut-in” pressure. Standard systems operate on a 30/50 PSI cycle, cuts in at 30 PSI and cuts off at 50 PSI, or a 40/60 PSI cycle.
- Turn off the power: Shut off the electrical breaker dedicated to your well pump. Working on a pressurized system with live electricity is highly dangerous.
- Drain the tank: Open a nearby faucet, such as an outdoor hose spigot, and let the water run until the flow completely stops. Your pressure gauge should read exactly 0 PSI. Keep the faucet open.
- Measure the air pressure: Locate the Schrader valve, the same type of air valve found on a car or bicycle tire, at the top of your pressure tank. Remove the protective cap and use a standard tire pressure gauge to measure the pressure.
- Adjust the pre-charge: Your pressure tank air pre-charge should be set to exactly 2 PSI below the pump’s cut-in pressure. For example, if your cut-in pressure is 30 PSI, your air charge must be 28 PSI. If it is 40 PSI, your air charge must be 38 PSI. Use a bicycle pump or air compressor to add air, or gently depress the valve stem to release air until you hit the magic number.
- Check for a failed bladder: While testing the air pressure, if water squirts out of the Schrader valve instead of air, your internal bladder has ruptured. This means the tank is ruined and must be replaced immediately.
- Restore power: Close the drain faucet, turn the electrical breaker back on, and monitor the system as it repressurizes.
When pressure tank symptoms keep coming back, our article on well pump short cycling causes and solutions can help you understand whether the issue is likely related to the tank, pressure switch, check valve, or pump itself.
Addressing Seasonal Challenges, Well Yield, and Water Quality
In New Hampshire, our local climate puts unique stresses on private well systems. From frozen pipes in Merrimack and Bedford to spring runoffs in Londonderry and summer droughts in Salem, your well pump has to endure a lot throughout the year.
- Winter freezing: Subfreezing temperatures can freeze the water inside above-ground jet pumps and exposed piping, causing the metal or plastic to crack. Always insulate pipes in unheated basements, crawlspaces, or pump houses. In extreme cold snaps, letting a tiny trickle of water run overnight from a cold tap can keep water moving and prevent freeze-ups.
- Spring runoff: As the winter snow thaws and spring rains arrive, the rising water table can carry surface bacteria, fertilizer runoff, and sediment toward your wellhead. This is why spring is the absolute best time for your annual water quality test.
- Summer drought: Extended dry spells can lower the static water level in your well. If the water level drops below your pump’s intake, the pump can pull in air or run dry, which will quickly overheat and destroy the motor.
Troubleshooting Well Yield and Water Quality Issues
If you notice a gradual drop in your water pressure or find that you are running out of water during peak usage times, you might be facing a decline in well yield. A decrease of 25% or more in your well’s yield is a clear sign that your system needs professional rehabilitation.
Declining yield is rarely a sign that the aquifer is dry; instead, it is usually caused by physical or chemical changes inside the well. Here is a comparison of common well yield issues:
| Issue | Cause | Symptoms | Common Rehabilitation Method |
|---|---|---|---|
| Incrustation | Mineral scale (calcium, magnesium) coating the well screen and pump intake. | Gradual drop in water pressure and flow rate. | Professional chemical acid treatment to dissolve scale. |
| Bio-fouling | Iron bacteria feeding on minerals, creating a thick, slimy orange biofilm. | Cloudy water, musty odor, clogged filters, and reduced flow. | High-dosage shock chlorination combined with physical brushing. |
| Physical plugging | Fine silt, sand, or clay particles clogging the geological formations around the well. | Gritty or muddy water, abrasive wear on pump impellers. | High-velocity jetting, surging, or hydrofracturing to clear the aquifer pores. |
Shock Chlorination and Disinfection
If your annual water test comes back positive for coliform bacteria, or if you have recently had your well pump serviced, your system must be disinfected. The standard industry method is shock chlorination, which involves introducing a concentrated chlorine solution into the well to destroy bacteria throughout the well casing, pump, pressure tank, and household plumbing.
Warning: Shock chlorination is a highly coordinated process. Chlorine and acid must never be mixed in a well at the same time, as they react to create lethal chlorine gas.
During disinfection, a calculated amount of chlorine bleach, typically 2 cups of unscented household bleach for every 100 feet of well depth, plus 1 gallon for the plumbing, is poured into the well. A garden hose is then connected to an outdoor spigot and run back into the wellhead, recirculating the chlorinated water to thoroughly mix the water column. Faucets inside the house are opened until a strong chlorine smell is detected, then shut off. The chlorinated water must sit in the pipes for 12 to 24 hours to ensure complete disinfection before being flushed out.
Frequently Asked Questions about Well Systems
Navigating well ownership can be intimidating. Here are some of the most common questions we receive from homeowners in Derry, Manchester, and Nashua, NH.
What are the warning signs that my well pump is failing?
Your well pump will usually send out warning signs long before it stops working entirely. Keep an eye and ear out for:
- Sputtering faucets: If your faucets “spit” air when you turn them on, it means air has entered your water lines. This can happen if the water level in your well has dropped below the pump intake, or if there is a breach in your pump’s suction line.
- A sudden drop in water pressure: If your showers feel weak or your washing machine takes forever to fill, your pump may be struggling to push water, or your pressure tank may be failing.
- Constantly running pump: If you hear your well pump or pressure switch clicking continuously even when no water is being used, you likely have a waterlogged pressure tank, a failed check valve, or a leak in your underground supply line.
- Spikes in your electric bill: A struggling pump motor or a pump that runs constantly will consume massive amounts of electricity, leading to a sudden, unexplained increase in your monthly energy bills.
What is the difference between DIY maintenance and professional service?
Knowing your limits is essential for your safety and the longevity of your system.
- What you can handle, the DIY zone: Visual inspections of the wellhead, clearing vegetation, replacing sediment filter cartridges, monitoring your pressure gauge, and checking or adjusting the air pre-charge in your pressure tank.
- What requires a professional: Any task involving high-voltage electrical diagnostics, because your pump runs on a dangerous 240-volt circuit, replacing a pressure switch, replacing a pressure tank, shock chlorinating a heavily fouled well, or physically pulling a submersible pump out of the ground. Submersible pumps are located 100 to 400 feet underground, and attempting to pull them yourself without a professional well puller can result in dropping the pump down the casing, destroying your well permanently.
How much does routine well maintenance cost compared to emergency repairs?
The financial contrast is stark. Practicing preventive maintenance is always the most cost-effective option.
- Routine maintenance: Annual water testing ($100-$300) and professional inspections every 3 to 5 years ($250-$500) average out to about $200 to $500 per year. If you perform the basic visual and pressure tank checks yourself, you can save hundreds of dollars in professional service calls annually.
- Emergency repairs: If your pump burns out due to a neglected, short-cycling pressure tank, emergency repair fees can easily top $1,600. This often includes premium after-hours labor rates and diagnostic fees.
- Replacement costs: Replacing a failed well pump altogether ranges from $900 to $2,500 and can exceed $5,000 for exceptionally deep wells. Replacing a waterlogged pressure tank costs between $300 and $1,200.
Conclusion
Your well pump is the heart of your home’s water system. By spending just a few minutes each month on basic visual checks and keeping your pressure tank properly pressurized, you can prevent catastrophic system failures, protect your family’s health, and save thousands of dollars in emergency repairs.
At Daigle Plumbing, Heating & Cooling, we have been serving our neighbors in Derry, Salem, Manchester, Nashua, and across New Hampshire for over 40 years. As a family-owned business, we pride ourselves on delivering licensed, insured expertise with a 100% satisfaction guarantee.
Whether you need a routine annual inspection, help adjusting your pressure tank, or a complete system upgrade, our team is here to help. Contact our professional well pump technicians today to schedule your service.