When Your Well Acts Up: Quick Answers for Every Homeowner
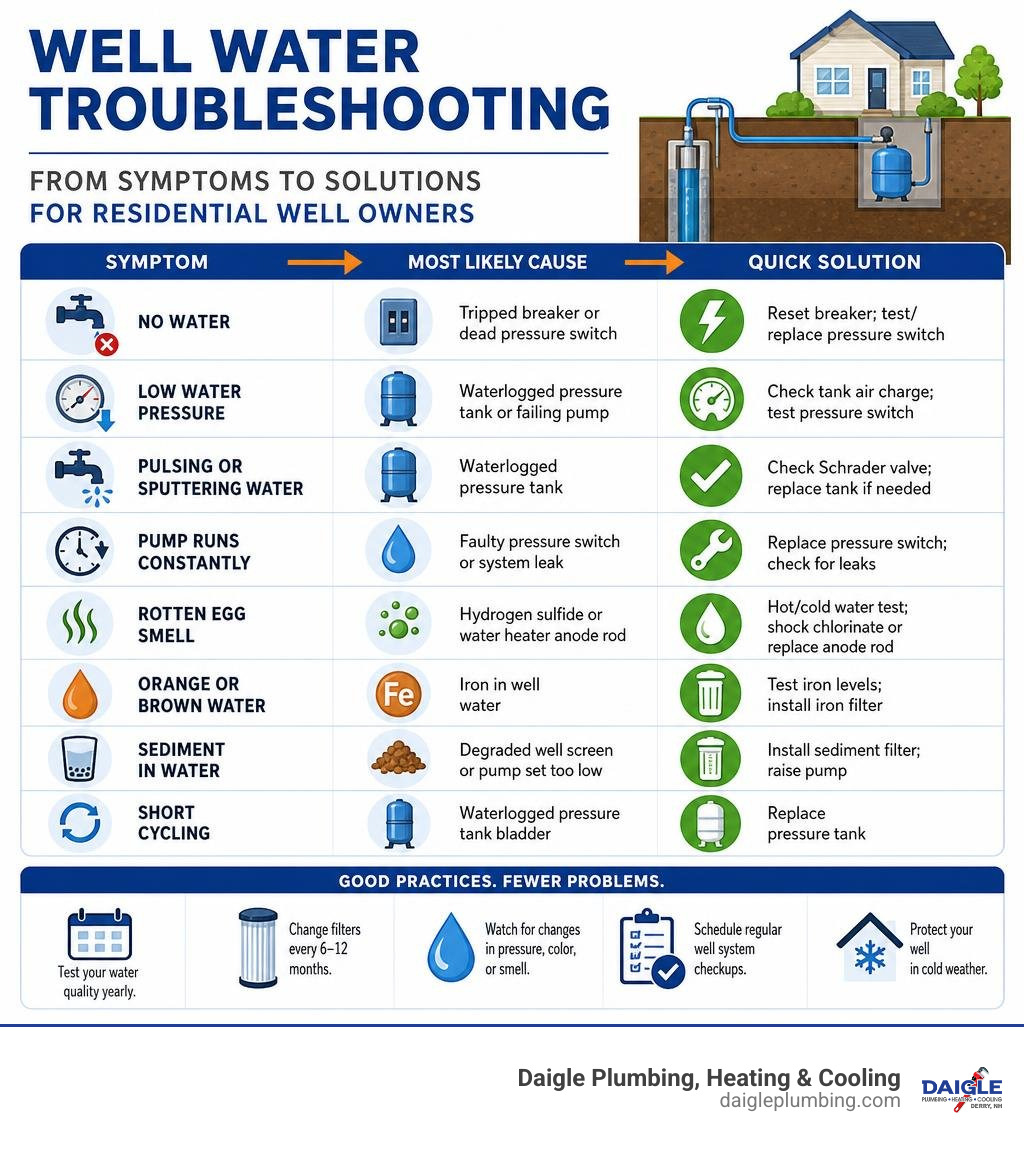
Well problems and solutions every homeowner should know at a glance:
| Problem | Most Likely Cause | Quick Fix |
|---|---|---|
| No water | Tripped breaker or dead pressure switch | Reset breaker; test/replace pressure switch |
| Low water pressure | Waterlogged pressure tank or failing pump | Check tank air charge; test pressure switch |
| Pulsing or sputtering water | Waterlogged pressure tank | Check Schrader valve; replace tank if needed |
| Pump runs constantly | Faulty pressure switch or system leak | Replace pressure switch; check for leaks |
| Rotten egg smell | Hydrogen sulfide or water heater anode rod | Hot/cold water test; shock chlorinate or replace anode rod |
| Orange or brown water | Iron in well water | Test iron levels; install iron filter |
| Sediment in water | Degraded well screen or pump set too low | Install sediment filter; raise pump |
| Short cycling | Waterlogged pressure tank bladder | Replace pressure tank |
You turn on the tap and nothing comes out. Or the water sputters, smells strange, or leaves rust stains on everything it touches. For homeowners in Derry, NH who rely on a private well, these moments can feel stressful, especially when you’re not sure if you’re dealing with a simple adjustment or a bigger repair.
The good news? Most well problems follow predictable patterns. And many of them can be diagnosed, and even fixed, without calling a professional.
This guide walks you through the most common well problems and their solutions, from no water and low pressure to bad smells and sediment, so you can take action fast and know exactly when to call for backup.
At Daigle Plumbing, Heating & Cooling, our hands-on plumbing service experience gives us a practical, field-tested perspective on well problems and solutions. This guide will help you cut through the confusion and focus on what actually works.
Basic well problems and solutions vocab:
Understanding Your Residential Well Water System
Before diving into troubleshooting, it helps to understand how your residential well system actually works. Think of your well system as a team where every player has a highly specific job. When one player slacks off, the entire water supply suffers.
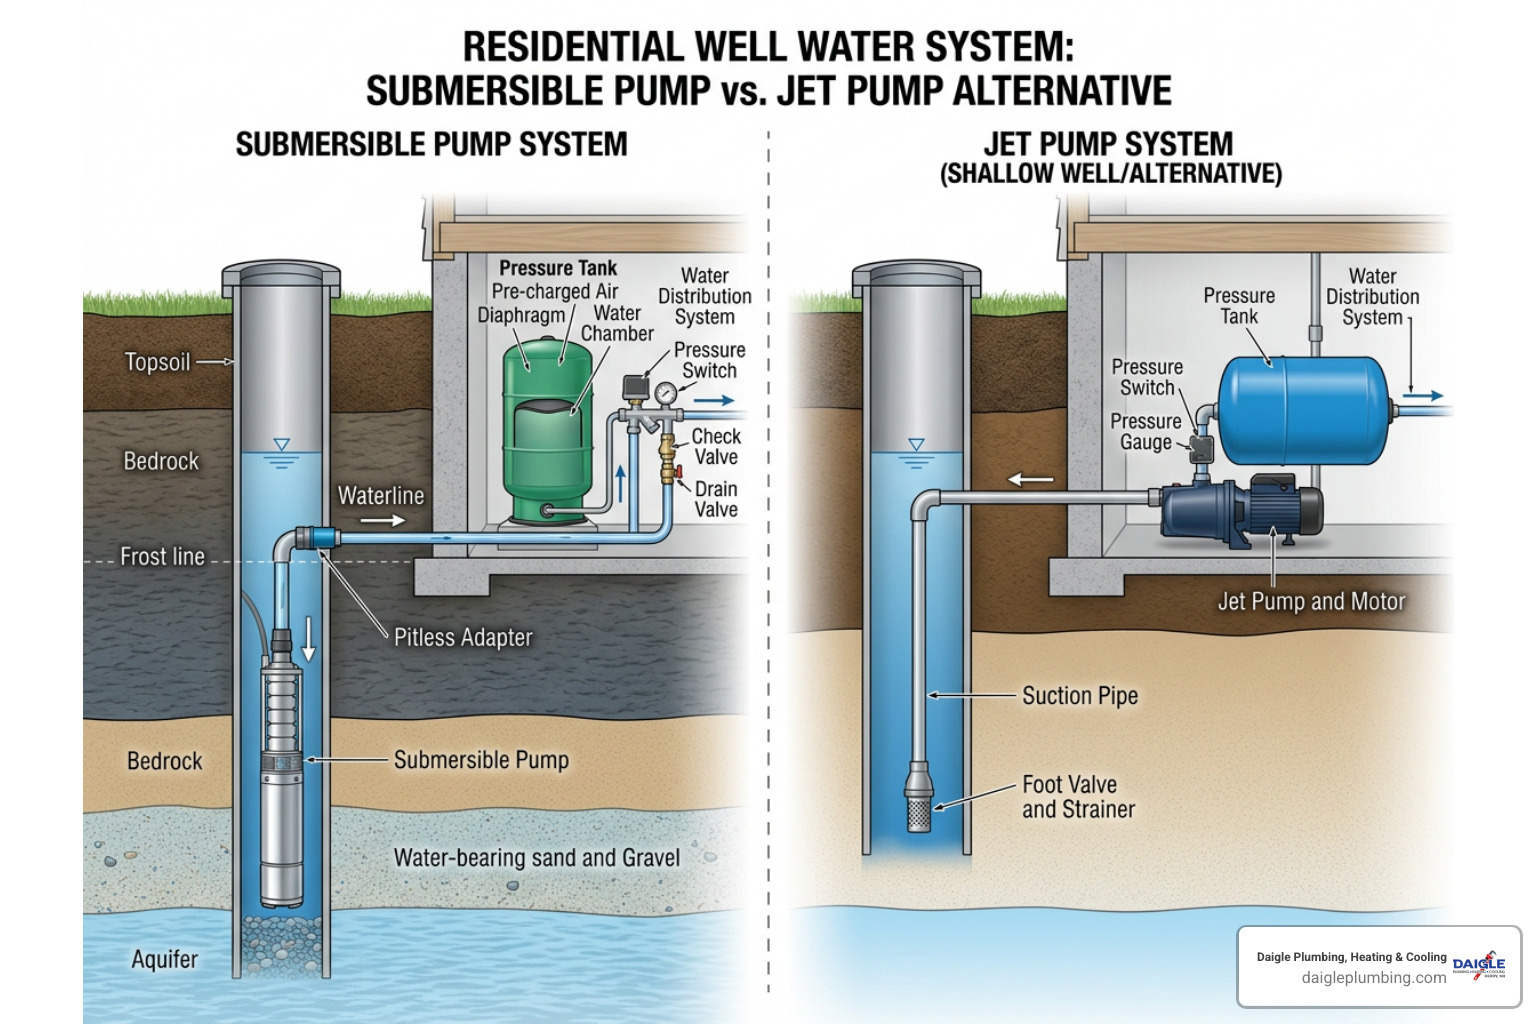
Here is a breakdown of the primary components keeping the water flowing in your New Hampshire home:
- The Well Pump: This is the heart of the system. It creates the flow of water. There are two primary types of pumps used in homes:
- Submersible Pumps: These are lowered deep inside the well casing itself. They push water upward into the home. They are highly efficient, long-lasting (typically 8 to 15 years), and virtually silent because they operate deep underground.
- Jet Pumps: These are mounted above ground, usually in a basement or utility closet. They use suction to pull water up through a pipe. Jet pumps are typically used for shallow wells (under 25 feet deep).
- The Pressure Tank: While the pump creates water flow, the pressure tank creates and stores water pressure. Inside the tank is a heavy-duty rubber bladder surrounded by compressed air. When the pump runs, it pushes water into this bladder, compressing the air. When you turn on a faucet, this compressed air pushes the water out. This prevents your pump from having to turn on every single time you rinse a cup.
- The Pressure Switch: This is the brain of the plumbing system. Usually mounted on a small gray box near the base of your pressure tank, it monitors the water pressure. When the pressure drops to a set minimum (the “cut-in” pressure, typically 30 or 40 PSI), the switch tells the pump to turn on. Once the pressure builds back up to the maximum limit (the “cut-out” pressure, typically 50 or 60 PSI), the switch shuts the pump off.
- The Check Valve: This one-way valve ensures that once water is pumped up into your home, it cannot flow backward into the well. If this valve fails, your system will constantly lose pressure when the pump is off.
Understanding the difference between your pump options is crucial if you are planning an upgrade or replacing a worn-out system.
| Feature | Submersible Pump | Jet Pump |
|---|---|---|
| Location | Deep inside the well casing | Above ground (basement/well house) |
| Operation | Pushes water upward (highly efficient) | Pulls water via suction (less efficient) |
| Well Depth | Deep wells (up to hundreds of feet) | Shallow wells (typically under 25 feet) |
| Noise Level | Silent (underground) | Moderate to loud motor hum |
| Average Lifespan | 8–15+ years | 8–12 years |
To ensure your system operates efficiently, the pressure tank must be sized correctly for your pump’s flow rate. A tank that is too small will cause your pump to cycle on and off too frequently, drastically shortening its life. You can learn to properly size a well pressure tank to make sure your setup is optimized for your household needs.
Troubleshooting Common Well Problems and Solutions
When something goes wrong with your well, it usually makes itself known through very specific symptoms. Let’s look at the most common issues and how you can track down the root cause.

Low Water Pressure
Low water pressure is the single most common complaint among private well owners. In fact, statistics show that low pressure affects approximately 25% of well owners at some point. However, fewer than 20% ever attempt to diagnose the problem themselves.
If you notice your water pressure has dropped across all fixtures, start by checking your pressure gauge. If the gauge reads low (below 30 PSI), your pressure switch might be failing, or your pump may be struggling to build pressure. If you are experiencing low pressure only at specific faucets, the issue is likely a clogged aerator or a localized plumbing restriction rather than the well itself.
No Water
Turning on the tap and getting absolutely nothing is the ultimate well owner nightmare. But don’t panic yet. Up to 60% of total water loss cases are caused by simple electrical issues, not a dead well pump.
Before assuming you need a new pump, work through a simple symptom-to-solution checklist. First, check your home’s main electrical panel to see whether the well pump circuit breaker has tripped. If the breaker looks fine, inspect the pressure switch. Over time, the contacts inside the switch can get dirty, burned, or pitted, which may stop electrical current from reaching the pump.
Pulsing or Sputtering Water
If your water pressure fluctuates wildly or sputters when you turn on the faucet, you are likely dealing with a classic case of short cycling. Short cycling occurs when the pump turns on and off rapidly (every 10 to 30 seconds) while water is running.
This rapid cycling is incredibly hard on your pump motor and can lead to premature failure. To learn more about what causes this behavior and how to stop it before it destroys your pump, check out our guide on Well Pump Short Cycling Causes and Solutions.
Electrical and Mechanical Well Problems and Solutions
If your pump won’t run or runs constantly, the issue is almost always electrical or mechanical. Here is how to systematically troubleshoot these components safely:
- Check the Circuit Breaker: Go to your breaker panel and locate the double-pole breaker labeled “Well Pump.” If it has tripped, flip it fully to the “off” position, then back to “on.” If it trips again immediately, do not force it—this indicates a direct electrical short in the pump motor, control box, or wiring, which requires professional repair.
- Inspect the Pressure Switch: Turn off the power to the pump at the breaker. Remove the plastic cover of the pressure switch. Look closely at the metal electrical contacts. If they are covered in black soot, carbon, or look melted, they aren’t making a good electrical connection.
- Quick Temporary Fix: You can gently clean pitted contacts using a clean nail file or fine sandpaper to restore temporary operation while you wait for a replacement switch. A new pressure switch is an inexpensive part (typically $25 to $45) and can be replaced in about 30 to 60 minutes.
- Check the Pump Control Box: If you have a deep submersible pump, you likely have a control box mounted on the wall near your pressure tank. This box contains a starting capacitor that helps kick-start the pump motor. If the capacitor is bulging or leaking fluid, the pump won’t start. Replacing a starting capacitor is a quick, $15 to $30 fix that saves you from replacing the entire pump.
- Confirm the Wiring: Loose or corroded wire connections at the pressure switch or control box can cause intermittent power loss. If you are comfortable working with electrical systems, you can follow our Wire It Right: A Step-by-Step 220V Well Pump Wiring Guide to ensure your system’s wiring is safe, secure, and up to code.
Water Quality and Odor Well Problems and Solutions
Water quality issues can be highly disruptive, affecting how your water smells, tastes, and looks. Many well owners in New Hampshire deal with naturally occurring minerals and gases in their groundwater.
Rotten Egg Smell
If your water smells like sulfur or rotten eggs, you are likely dealing with hydrogen sulfide gas or sulfate-reducing bacteria. To isolate the problem, perform a quick hot-vs-cold water test:
- Fill a clean glass with cold well water and smell it.
- Fill another glass with hot water and smell it.
- If the smell is only in the hot water: The problem is inside your water heater. The magnesium anode rod in your water heater is reacting with sulfates in the water, producing hydrogen sulfide gas. Replacing the magnesium rod with an aluminum/zinc anode rod will solve this issue.
- If the smell is in both hot and cold water: The gas is coming directly from your well aquifer or plumbing lines.
Iron Staining and Hard Water
About 85% of the United States has hard water, and New Hampshire is no exception. Hard water contains high levels of calcium and magnesium, which cause white, crusty scale buildup on faucets, dry out your skin, and reduce the efficiency of your water heater by up to 30%.
Even worse, many local wells suffer from high iron levels. The EPA secondary standard for iron is 0.3 mg/L, but many wells test far above this. Iron causes unsightly orange or red-brown stains in sinks, toilets, and laundry.
Sediment and Sand
If your water looks cloudy or has gritty sand at the bottom of the glass, your well screen may be degraded, or your submersible pump may be installed too close to the bottom of the well casing, allowing it to suck up silt.
To help you diagnose specific water odors, keep this handy reference guide nearby:
- Rotten Eggs: Hydrogen sulfide gas or sulfur bacteria. (Harmless in low levels, but highly unpleasant).
- Musty, Earthy, or “Swampy” Smell: Decaying organic matter or harmless iron bacteria.
- Sewage or Septic Smell: Potential septic system intrusion. Stop drinking the water immediately and test for coliform bacteria.
- Metallic or “Iron” Taste/Smell: High levels of dissolved iron or manganese.
- “Dirty Socks” or “Wet Dog” Smell: Bacteria buildup inside a water heater kept below 140°F.
If you are noticing changes in your water quality, do not overlook the well tank. A failing or waterlogged tank can stir up sediment, affect pressure, and contribute to unpleasant water issues. Rotten egg smells, iron staining, hard water buildup, or cloudy water may point to problems with the tank, plumbing, water heater, or the well itself. Persistent odors or water quality changes should be tested and diagnosed before choosing a treatment.
How to Diagnose and Fix Well Pressure Tank Issues
A healthy pressure tank is vital to the longevity of your well pump. When a pressure tank fails, it is usually because the internal rubber bladder has ruptured. This causes the tank to become waterlogged, meaning the air chamber has filled entirely with water.
A waterlogged tank can cause your pump to short cycle, leading to high electric bills and a burned-out pump motor. Here is how to diagnose and fix a failing pressure tank:
The Air Valve Check (The “Schrader” Valve Test)
Locate the small air valve (identical to a bicycle tire valve) on the top of your pressure tank.
- Depress the tiny center pin of the valve with a small screwdriver.
- If air hisses out: The bladder is likely still intact.
- If water squirts out: The internal bladder has ruptured, and the tank is waterlogged. The tank must be replaced.
The Rocking Test
Try to gently rock or shake the pressure tank from side to side. A healthy pressure tank should feel relatively light and top-heavy because the top half is filled with air. If the tank feels incredibly heavy, solid, and refuses to budge, it is completely filled with water and has failed.
How to Check and Adjust Tank Pre-Charge Pressure
To prevent premature tank failure, you should check your tank’s air pressure annually:
- Turn off the power to your well pump at the circuit breaker.
- Open a faucet near the tank and let the water run until it stops completely. This drains all water and relieves system pressure.
- Use a standard tire pressure gauge to check the pressure at the tank’s air valve.
- The pre-charge pressure should be exactly 2 PSI below your pressure switch’s cut-in setting.
- For example, if your switch turns the pump on at 40 PSI, your tank pressure should be set to 38 PSI. If it is low, use an air compressor to add air until it reaches the correct level.
Well Pump Troubleshooting: When to DIY vs. Call a Professional
As a homeowner, saving money is always a priority. Many well issues, like replacing a pressure switch or recharging a pressure tank, are highly accessible DIY projects that can be completed for under $50.
However, some repairs carry significant safety risks or require specialized equipment. Use this guide to decide when to tackle a project yourself and when to call the experts at Daigle Plumbing, Heating & Cooling.
The 50% Rule for Well Pumps
When deciding whether to repair or replace an aging well pump, apply the 50% rule: If the cost of repairing the pump exceeds 50% of the cost of a full replacement, and the pump is more than 8 years old, it is highly recommended to replace the pump entirely. This saves you from paying for a temporary fix only to face a total pump replacement a year later.
DIY Safety Checklist
Before attempting any DIY well repairs, always run through this safety checklist:
- Turn Off the Power: Never work on a pressure switch, control box, or pump wiring without turning off the dedicated circuit breaker and testing the wires with a non-contact voltage tester to confirm the power is off.
- Relieve System Pressure: Always drain the water pressure from your plumbing system before removing a pressure switch, pressure gauge, or opening any water lines. Working on pressurized plumbing can cause severe injury or flooding.
- Sanitize After Repairs: Any time you open up your well casing or disconnect water lines, you risk introducing bacteria into your drinking water. Always shock chlorinate your well and test the water before drinking it after any major repair.
When to Call a Professional Well Contractor
You should step aside and call a licensed plumber or well professional if:
- The Submersible Pump Needs to Be Pulled: Pulling a submersible pump out of a well casing that is hundreds of feet deep requires heavy-duty motorized pullers and specialized safety rigging. Attempting to pull a pump by hand can result in dropping the pump down the well, destroying the casing permanently.
- The Pump Runs Constantly but Won’t Build Pressure: This often indicates a broken water line underground between the well and your home, or a completely worn-out pump impeller.
- You Suspect Electrical Shorts in the Well: If your well pump breaker trips instantly every time you reset it, there is an electrical short in the underground wiring or the pump motor itself.
Frequently Asked Questions About Well Systems
How long do well pumps and pressure tanks typically last?
On average, high-quality submersible well pumps last between 8 and 15 years, though properly maintained pumps can sometimes last 20 years or longer. Above-ground jet pumps typically last 8 to 12 years. Well pressure tanks generally last 5 to 10 years, depending on the water quality and how often the pump cycles.
To get the most life from your well components, check the pressure tank’s air charge once a year and replace a failing pressure switch quickly. For lower energy use and less equipment strain, consider efficiency upgrades that help your well pump run less often.
Why does my well water smell like rotten eggs?
This odor is almost always caused by hydrogen sulfide gas or sulfate-reducing bacteria. If the smell occurs only when running hot water, the culprit is a chemical reaction between your water heater’s magnesium anode rod and the minerals in your water. Replacing the magnesium rod with an aluminum/zinc rod will eliminate the odor. If the smell is present in both hot and cold water, the gas is coming directly from your well aquifer, and shock chlorination or a specialized whole-house carbon filtration system is required to neutralize it.
What routine maintenance should I perform on my well system?
To prevent costly emergency repairs, we recommend performing these three simple maintenance tasks every year:
- Test Your Water: The EPA recommends testing your well water annually for coliform bacteria, nitrates, pH, and total dissolved solids (TDS).
- Check Tank Pressure: Drain your system and use a tire gauge to confirm your pressure tank’s pre-charge pressure is exactly 2 PSI below your pump’s cut-in pressure.
- Inspect the Well Cap: Walk out to your wellhead and verify that the sanitary well cap is securely sealed, free of cracks, and elevated at least 12 inches above the surrounding ground to prevent surface runoff or insects from entering your drinking water.
Conclusion
Managing private well problems and solutions doesn’t have to be a guessing game. By understanding how your system’s pump, pressure tank, and switch work together, you can easily troubleshoot minor issues, save money on simple DIY repairs, and maintain clean, reliable water for your household.
But when a well issue is too complex, dangerous, or requires specialized equipment, you don’t have to tackle it alone. At Daigle Plumbing, Heating & Cooling, we have been serving homeowners in Derry, NH, and surrounding communities like Londonderry, Windham, and Manchester for over 40 years. Our team of licensed, insured plumbing experts is ready to restore your water quickly and safely.
If you are experiencing low water pressure, a short-cycling pump, or need a professional inspection, contact our expert plumbers today to schedule an appointment with our family-owned team. We back all of our work with a 100% satisfaction guarantee!