Signs of a Broken Water Heater Thermostat
If you need to fix a water heater thermostat, here is the short answer:
- Turn off power at the circuit breaker.
- Remove the access panel and insulation to reach the thermostat.
- Press the red reset button on the high-limit switch.
- Test the thermostat with a multimeter for continuity.
- Replace the faulty thermostat if it shows no continuity, ensuring firm contact with the tank wall.
- Restore power and check for hot water within 15 minutes.
Hot water is something most of us take for granted until a cold shower at 6 a.m. makes it impossible to ignore. A faulty thermostat is actually the most commonly damaged part of an electric water heater, and it can cause everything from lukewarm water to no hot water at all.
The good news? In many cases, you can diagnose and fix the problem yourself. This guide walks you through exactly how to do it safely.
At Daigle Plumbing, Heating & Cooling, our licensed plumbing and HVAC team has hands-on experience with countless calls to fix water heater thermostat problems for homeowners just like you. Whether you prefer the DIY route or want a licensed pro to handle it, this guide gives you everything you need to make the right call.
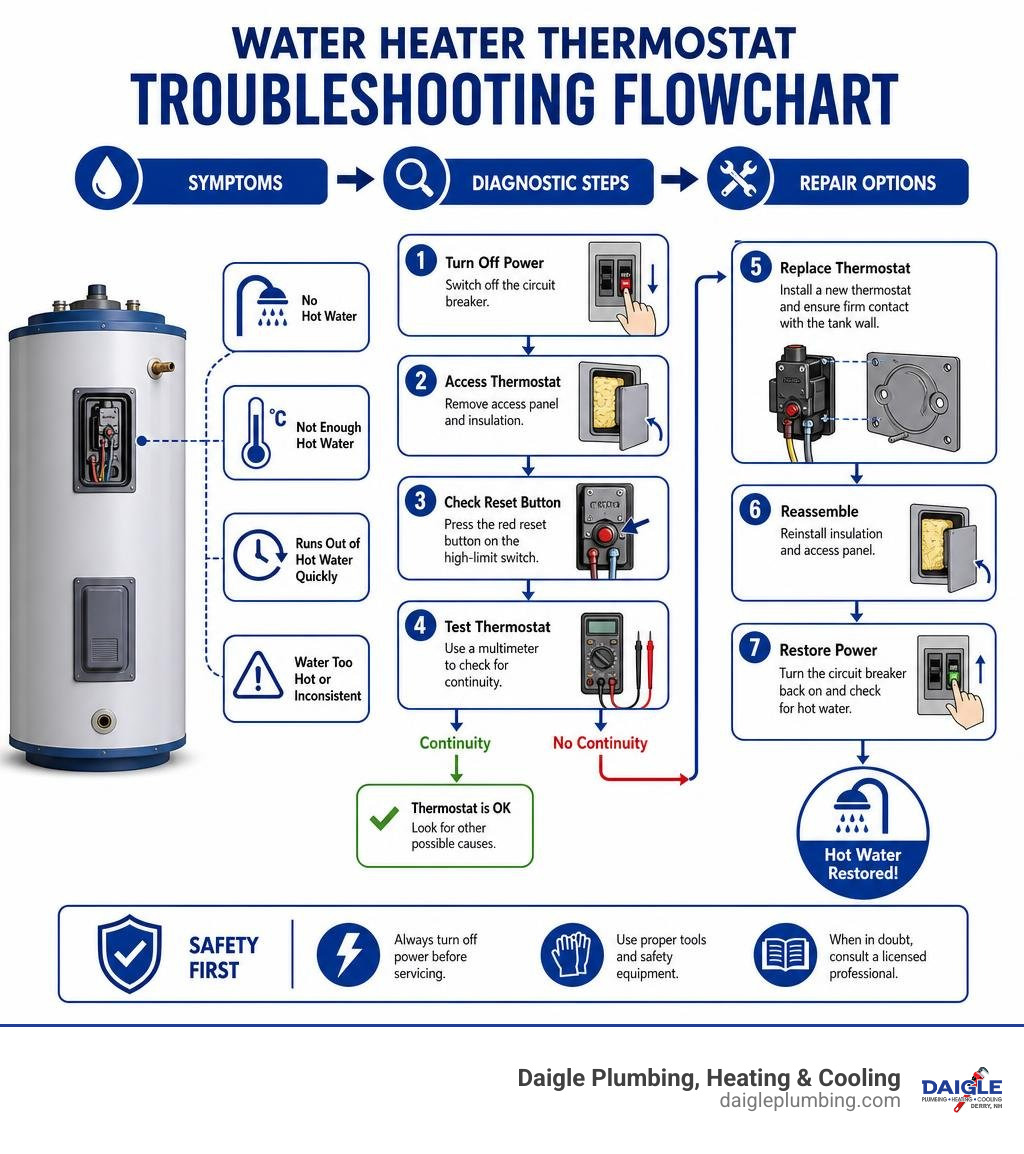
Before you grab your tools to fix water heater thermostat issues, you need to confirm that the thermostat is actually the culprit. Because your water heater relies on a combination of electrical components, thermostats, and heating elements, a failure in one can easily mimic a failure in another.
Here are the most common signs that your water heater thermostat has gone bad:
- Inconsistent Water Temperatures: If your shower alternates between freezing cold and scalding hot without anyone touching the handle, your thermostat is likely struggling to accurately read the tank’s internal temperature.
- Water Is Way Too Hot: If your water temperature suddenly spikes to dangerously high levels, a thermostat may be stuck in the “on” position. This is a serious safety hazard. If the water temperature inside the tank climbs too high, the Energy Cut-Off (ECO) high-limit switch should trip at 170°F to cut power. If that fails, the Temperature and Pressure (T&P) relief valve is designed to release water at 210°F to prevent a dangerous steam explosion.
- Not Enough Hot Water (Insufficient Heating): If you get a few minutes of hot water before it turns lukewarm, one of your dual thermostats (usually the lower one) has likely failed. Alternatively, this can indicate a failed lower heating element.
- Water Takes Too Long to Reheat (Slow Recovery): Electric water heaters naturally take about twice as long to reheat as gas heaters. However, if your recovery time stretches to several hours, a malfunctioning thermostat is likely failing to signal the heating elements to turn on when cold water enters the tank.
If you notice any of these issues, it is time to inspect your system. Learning how to tell whether you may be in need of water heater repair can help you catch these warning signs before they turn into major floods or costly emergencies.
How Dual Thermostats Work and How to Test Them
To successfully fix water heater thermostat problems, you must understand how a standard dual-element electric water heater operates. Most modern residential electric water heaters are designed as “non-simultaneous” systems. This means that even though the tank has two heating elements and two thermostats, only one element runs at a time.
Here is a breakdown of how the upper and lower thermostats work together:
| Feature | Upper Thermostat | Lower Thermostat |
|---|---|---|
| Primary Role | Directs power; prioritizes heating the top portion of the tank first. | Maintains overall tank temperature once the top is hot. |
| Control Sequence | Has priority. If the top of the tank is cold, it shuts off power to the lower element. | Only receives power after the upper thermostat is satisfied. |
| High-Limit Switch (ECO) | Features the red ECO reset button to cut power if overheating occurs. | Does not contain a high-limit reset switch. |
| Typical Failure Symptom | Completely cold water (no power gets passed down the line). | Lukewarm water or a very short supply of hot water. |
When cold water enters the bottom of the tank, the upper thermostat takes priority. It powers the upper element to quickly heat the top portion of the water so you have immediate hot water for quick tasks. Once the upper thermostat reaches its set temperature, it mechanically switches its internal bimetallic strip to route power down to the lower thermostat. The lower thermostat then cycles the lower element on to heat the rest of the tank.
If a thermostat problem turns into a larger plumbing concern, Daigle Plumbing, Heating & Cooling can help with professional plumbing services in Derry, NH for water heaters, fixtures, leaks, and related repairs.
Using a Multimeter to Fix Water Heater Thermostat Issues
A multimeter is the single most valuable tool for diagnosing a faulty thermostat. To test for continuity (which determines if electricity can flow through a path), you must turn off the power to the unit first.
- Set your multimeter: Turn the dial to the lowest ohms setting ($\Omega$) or the continuity setting (which beeps when the probes touch).
- Access the terminals: With the power completely off, locate the terminals on your upper thermostat.
- Test the High-Limit Switch: Touch the multimeter probes to the two top terminals (usually where the main power lines enter). You should get a reading close to $0$ ohms (or a beep), indicating continuity. If there is no continuity, press the red ECO reset button. If it still shows no continuity after resetting, the high-limit switch is bad and the thermostat must be replaced.
- Test Upper Thermostat Terminals (T5 to T6 and T5 to T7):
- With the water in the tank cold, check the resistance between terminal T5 and T6 (which feeds the upper element). You should see continuity ($0$ ohms).
- Check between T5 and T7 (which feeds the lower thermostat). Since the water is cold, this should show no continuity (open loop).
- If you manually turn the thermostat dial all the way down (simulating hot water), the continuity should flip: T5 to T6 should open, and T5 to T7 should close. If this transition doesn’t happen, the internal bimetallic mechanism is broken.
Never ignore these electrical faults. Understanding why it is never a good idea to delay your water heater repair call can prevent electrical shorts, melted wiring, or complete system failures.
Testing the Upper vs. Lower Thermostat
If you want to test the thermostats while the power is live, you must use extreme caution and a voltmeter.
- Live Voltage Testing: With power restored, a voltmeter can check if the upper thermostat is successfully passing 240 volts down to the lower thermostat. If the upper tank is hot but the lower element isn’t heating, check for 240V at the lower thermostat terminals. If voltage is present at the lower thermostat input but not at the lower element terminals, the lower thermostat is faulty.
- Non-Contact Voltage Tester: While a non-contact voltage tester is a fantastic safety tool to verify that power is off, it is not reliable for diagnosing specific thermostat faults. It only tells you if voltage is present nearby, not whether the correct amount of voltage is cycling through the bimetallic strip of the thermostat. Always rely on a digital multimeter for accurate diagnosis.
Safety Precautions Before You Fix Water Heater Thermostat
Working on an electric water heater means dealing with 240 volts of electricity and scalding hot water. Safety is not optional. Before you touch any internal components, follow these strict safety protocols:
- Shut Off the Power: Locate your home’s main circuit breaker panel and switch off the dedicated double-pole breaker labeled “Water Heater.”
- Verify, Don’t Guess: Breaker panels can be mislabeled. After turning off the breaker, remove the water heater’s metal access covers and use a non-contact voltage tester directly on the incoming wire terminals to ensure there is absolutely no electrical current present.
- Protect Yourself: Wear safety glasses and heavy-duty work gloves. The fiberglass insulation behind the access panels can cause severe skin irritation.
- Stay Dry: Never stand in water or on a damp floor while working on electrical components. If the area around your water heater is wet, resolve the leak and dry the floor completely first. Standing on a dry wooden board can provide an extra layer of insulation.
Homeowners who want to reduce future repair risks should also keep up with water heater maintenance. A regular flush water heater service helps limit sediment buildup that can strain thermostats, elements, and the tank itself.
Step-by-Step Thermostat Replacement Guide
If your diagnostic tests revealed a dead thermostat, replacing it is a straightforward task. Here is how to do it:
Tools Needed:
- Replacement thermostat (Ensure it matches your model’s specifications. Most brands are interchangeable, except for Whirlpool Energy-Smart models).
- Phillips and flathead screwdrivers.
- Digital multimeter.
- Non-contact voltage tester.
- Work gloves and safety glasses.
Step 1: Document the Wiring
Before disconnecting a single wire, take a clear, well-lit photo of the existing wiring configuration with your phone.
Step 2: Disconnect the Wires
Using your screwdriver, loosen the terminal screws and carefully pull the wires away. Work systematically, labeling them if necessary.
Step 3: Remove the Old Thermostat
Most thermostats are held in place by plastic or metal spring clips attached to the tank bracket. Gently pry the clips outward and slide the old thermostat up and out of the bracket.
Step 4: Install the New Thermostat
Slide the new thermostat into the mounting bracket. Crucial Step: Ensure the metal back of the thermostat sits completely flat and flush against the steel tank wall. If there is a gap, or if insulation gets trapped behind it, the thermostat will not read the water temperature accurately. This can cause the elements to run continuously, leading to rapid overheating.
Step 5: Reconnect and Protect
Using your photo as a guide, reconnect the wires to their respective terminals. Tighten the screws firmly, but avoid overtightening, which can strip the threads. Press the red ECO reset button on the new upper thermostat to ensure it is engaged. Reinstall the plastic terminal protector, replace the insulation, and screw the outer metal access covers back on.
For bigger system issues, like a failing tank, repeated thermostat failures, or a unit near the end of its service life, the team can also help with professional water heater installation and repair in Derry, NH.
When to Replace Both Thermostats
While you can technically replace just one failed thermostat, we highly recommend replacing both the upper and lower thermostats at the same time.
Because they operate in tandem and experience the same electrical wear and tear, if one has reached the end of its lifespan, the other is usually not far behind. Additionally, if your water heater is approaching several years of service, installing a complete tune-up kit (which includes both thermostats and both heating elements) is a cost-effective way to restore the unit to like-new performance. Learning how to extend the lifespan of your water heater can also help you decide when maintenance makes sense and when replacement is the smarter long-term choice.
Why New Thermostats Fail and Other Common Issues
It can be incredibly frustrating to install a brand-new thermostat only to have it fail or trip the high-limit switch a few weeks later. If this happens, the thermostat itself is rarely the issue. Instead, look for these common system problems:
- Heavy Sediment Buildup: Over time, hard water minerals settle to the bottom of the tank. This thick layer of sediment insulates the lower heating element, forcing it to work twice as hard to heat the water. The trapped heat can cause the lower bimetallic thermostat to misread temperatures or overheat, tripping the ECO switch.
- Faulty Heating Elements: A heating element can develop a microscopic crack in its outer sheath, causing the internal electrical wire to short out directly to the water (a condition known as a “grounded element”). When this happens, the element runs continuously at 120V even if the thermostat cuts power to the main 240V line. This causes the water to overheat and repeatedly trip the high-limit switch.
- Poor Tank Contact: If the thermostat is not held tightly against the tank by its retaining clip, it will read the cooler air temperature inside the access cabinet rather than the hot water inside the tank. The system will continue heating the water long past the set point, resulting in scalding water and tripped safety switches.
- Temperature Stacking: This occurs when frequent, short draws of hot water cause the upper element to cycle on and off repeatedly, stacking hot water at the very top of the tank. This can push temperatures well above the thermostat’s set point.
Frequently Asked Questions about Water Heater Thermostats
How do I know if my thermostat or heating element is bad?
The easiest way to tell is by running a continuity test with a multimeter. Turn off the power, disconnect the wires from the heating element, and touch the probes to the element’s terminal screws. A good element will show a resistance reading between $10$ and $30$ ohms. If the multimeter shows no continuity (an open loop) or reads $0$ ohms, the element is bad. If the elements test fine but the system still won’t heat, the thermostat is the broken component.
What temperature should my water heater thermostat be set to?
We recommend setting both your upper and lower thermostats to 120°F (49°C). This is the factory standard for most residential homes. It provides plenty of hot water for showers and appliances while preventing the risk of accidental scalding. At 120°F, it takes more than 5 minutes of continuous exposure to cause a serious burn. At 140°F, scalding can occur in less than 5 seconds. Setting your thermostat to 120°F also saves energy and slows down mineral buildup inside the tank.
Can I fix water heater thermostat wiring myself?
While replacing a thermostat is a manageable DIY task for many homeowners, working with 240V electricity carries inherent risks. A single loose wire can cause electrical arcing, melting components, or even a house fire. If you open your access panel and see blackened wires, melted plastic, or if you feel uncomfortable using a multimeter, you should always call a licensed professional to handle the repair.
Conclusion
Taking on a DIY project to fix water heater thermostat issues can be a rewarding way to save money and restore your home’s comfort. However, dealing with high-voltage electricity and pressurized hot water systems requires precision, patience, and the right diagnostic tools.
If you hit a roadblock, discover melted wiring, or simply prefer the peace of mind that comes with professional installation, Daigle Plumbing, Heating & Cooling is here to help. The team has been serving families across Derry, NH, and surrounding areas, including Salem, Manchester, Nashua, Auburn, Hampstead, Merrimack, Bedford, Windham, Hooksett, Hudson, and Londonderry, for over 40 years.
As a family-owned business, Daigle Plumbing, Heating & Cooling backs its work with licensed experts, flexible financing, and a 100% satisfaction guarantee. Don’t spend another day shivering through cold showers. Contact our professional water heater technicians and get your hot water flowing perfectly again!