What You Need to Know Before Replacing a Water Heater
Replacing a water heater is one of the most common home maintenance projects homeowners face and one of the most stressful when it happens without warning.
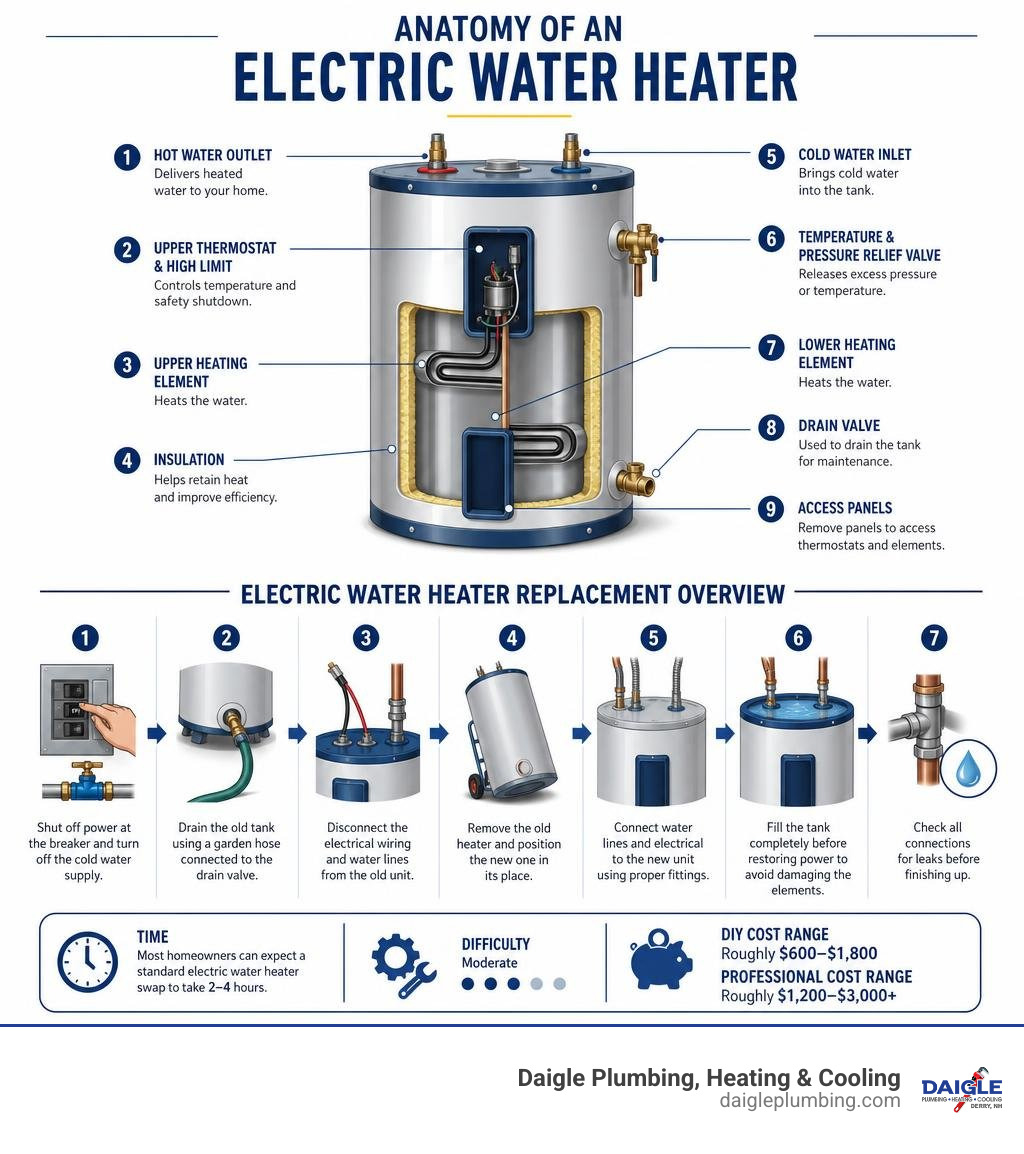
Here’s a quick overview of what the process involves:
- Shut off power at the breaker and turn off the cold water supply.
- Drain the old tank using a garden hose connected to the drain valve.
- Disconnect the electrical wiring and water lines from the old unit.
- Remove the old heater and position the new one in its place.
- Connect water lines and electrical to the new unit using proper fittings.
- Fill the tank completely before restoring power to avoid damaging the heating elements.
- Check all connections for leaks before calling the job done.
Most homeowners can expect a standard electric water heater swap to take 2–4 hours. Overall cost can vary widely based on the type of unit, installation complexity, code requirements, and local labor rates.
A cold shower is usually what finally pushes homeowners into action. Most tank-type water heaters last 8–12 years, but many fail without much warning. A slow leak, rusty water, or a sudden loss of hot water can catch you completely off guard.
The good news? An electric water heater replacement is more manageable than it sounds. It doesn’t involve gas lines or combustion venting, which makes it significantly safer for a prepared DIYer than replacing a gas unit. That said, it still involves live electrical wiring, heavy equipment, and pressurized water, so there’s real risk if steps are skipped or done out of order.
This guide walks you through every step clearly and safely, so you know exactly what you’re getting into before you touch a single pipe.
The Daigle Plumbing, Heating & Cooling team brings hands-on plumbing and HVAC field experience to every water heater installation and replacement. That team-based experience helps us understand exactly where replacing a water heater can go wrong and how to make sure it doesn’t.
Knowing When Replacing Water Heater Units is Necessary
It is easy to take your water heater for granted until you find yourself shivering under a stream of icy water. While some water heater issues can be resolved with a quick repair, others are clear signs that your tank is on its last legs.
Most standard tank-style water heaters have a reliable lifespan of 8 to 12 years. Even with routine maintenance, a water heater typically lasts only 10 to 15 years before the tank’s structural integrity degrades. Because these units are constantly exposed to water, heat, and pressure, internal corrosion is inevitable.
When your water heater begins to fail, delaying action can lead to catastrophic consequences. A small pinhole leak can rapidly turn into a major rupture, sending dozens of gallons of pressurized water flooding into your basement or utility closet. Understanding the threshold of your unit’s life is crucial, especially because waiting too long on water heater repair can turn a manageable service call into a much larger home damage problem.
If you are unsure whether your system is approaching its natural retirement, our breakdown of how often a water heater needs to be replaced explains typical lifespan ranges, warning signs, and when replacement becomes the safer investment.
Signs of Water Heater Failure
How do you know if your water heater is actively failing? Keep an eye and ear out for these common warning signs:
- Rumbling or Popping Noises: As water is heated, dissolved minerals sediment out and settle at the bottom of the tank. Over time, this sediment hardens into a thick crust. When the heating elements fire up, water gets trapped beneath this scale, boiling and popping like popcorn. This rumbling is a clear indicator of heavy sediment buildup, which forces your system to work harder and accelerates tank failure.
- Rusty or Discolored Water: If rusty water is only coming out of your hot water taps, it is a strong sign that the inside of your water heater tank is corroding. Once the glass lining inside the steel tank fails, the metal begins to rust, which will eventually eat all the way through the tank wall.
- Inconsistent Temperatures and Cold Showers: If your hot water runs out faster than it used to, or if you are experiencing lukewarm showers, your heating elements may be failing.
- Active Leaking Around the Base: If you spot water pooling around the bottom of your water heater, inspect it immediately. While some leaks come from loose fittings or a dripping Temperature and Pressure (T&P) relief valve, water weeping directly from the bottom of the tank jacket is a terminal diagnosis. The inner tank is cracked, and the unit must be replaced.
Addressing these issues early is not just about avoiding cold showers; it is also about keeping your utility bills under control. For homeowners in Southern New Hampshire, keeping a system running efficiently is key to managing winter energy costs. Timely water heater repair in Derry, NH can help reduce waste, stabilize performance, and prevent a small issue from becoming an emergency replacement.
Repair vs. Replacing Water Heater Units
Deciding whether to patch up your old unit or spring for a brand-new one comes down to a simple mathematical framework: The One-Third Rule.
If a water heater repair costs more than one-third of the price of a brand-new installation, and the unit is more than 8 years old, replacing the water heater is almost always the smarter, more cost-effective choice.
For example, replacing a faulty heating element or thermostat on a 4-year-old unit is a reasonable, low-cost repair. However, spending several hundred dollars to replace elements or valves on a 10-year-old tank that is already showing signs of internal corrosion is simply throwing good money after bad. Once a tank begins to leak from its main body, repairs are no longer an option because the tank cannot be patched.
Choosing Your New Water Heater: Sizing, Fuel, and Efficiency
When replacing a water heater, choosing the right replacement model is critical to ensuring your household has a reliable supply of hot water without skyrocketing your energy bills. You need to match the heater’s capacity to your family’s daily hot water demands.
For homeowners comparing standard tanks, tankless systems, and high-efficiency options, our guide to choosing the right type of water heater for your family can help narrow the decision before installation day.
Tank vs. Tankless and Heat Pump Options
Today’s homeowners have more options than ever, ranging from traditional storage tanks to high-tech energy savers:
- Traditional Storage Tanks: These units keep a reservoir of water (usually 40 to 50 gallons) hot and ready at all times. They have the lowest upfront purchase cost but suffer from “standby heat loss” because they constantly cycle on to keep the water hot, even when you are asleep or at work.
- Tankless Water Heaters: Often called “on-demand” heaters, these systems eliminate the tank entirely. They use high-powered heating elements to warm water instantly as it flows through the unit. While they have a higher upfront cost, they offer endless hot water and use significantly less energy. If you are weighing a tankless upgrade, our tankless water heater installation services in Derry, NH can help determine whether your home’s plumbing, electrical, or gas setup is a good fit.
- Heat Pump (Hybrid) Water Heaters: These highly efficient systems pull heat from the surrounding air and transfer it into the water tank. They can be up to three times more energy-efficient than standard electric heaters. While they cost more upfront, they can save you hundreds of dollars annually on utility bills and may qualify for federal tax credits and local utility rebates.
Sizing and Electrical Requirements for Replacing Water Heater Systems
If you decide to stick with a standard electric tank, you must ensure your electrical system can handle it. Most standard residential electric water heaters require a dedicated 240-volt circuit wired to a 30-amp or 40-amp double-pole breaker.
When sizing your water heater, do not just look at the gallon capacity. Pay close attention to the First Hour Rating (FHR) on the yellow EnergyGuide label. The FHR tells you how many gallons of hot water the unit can deliver in a single hour of peak usage.
- 1 to 3 People: Typically require a 40- to 50-gallon tank.
- 4 or More People: Typically require a 50- to 80-gallon tank.
Before purchasing, measure the physical space where your current water heater sits. Modern water heaters often have thicker insulation than older models to meet strict federal efficiency standards. A new 50-gallon tank may be slightly wider or taller than your old 50-gallon tank, which can make closets, alcoves, and utility rooms harder to work in. Check the height, width, clearance around the unit, drain access, and room for safe connections before choosing a replacement model.
Step-by-Step Guide to Replacing an Electric Water Heater Safely
Replacing an electric water heater is a highly structured process. Because you are dealing with both water and high-voltage electricity, skipping steps or rushed work can result in severe electrical shock, plumbing leaks, or a burnt-out heating element.
Before you begin, gather the necessary tools and materials:
- Non-contact voltage tester
- Pipe wrenches and adjustable wrenches
- Screwdrivers
- Tubing cutter or hacksaw
- Garden hose
- Plumber’s Teflon tape
- New water heater and a new T&P relief valve (usually included)
- Flexible water supply connectors and dielectric unions
Step 1: Shutting Off Power and Water
Safety begins at your home’s main electrical panel.
- Locate the dedicated double-pole breaker labeled “Water Heater” and flip it to the OFF position.
- Go to the water heater, remove the metal electrical junction cover on top of the unit, and carefully pull out the wire connections.
- Use a non-contact voltage tester to verify that there is absolutely no electrical current running through the wires. Do not touch any wires until your tester confirms the power is completely dead.
- Locate the cold water shutoff valve above the water heater and turn it clockwise until it is fully closed. If the local valve is old or frozen, you may need to shut off your home’s main water supply.
Step 2: Draining the Old Tank Safely
Water is incredibly heavy, weighing approximately 8.3 pounds per gallon. A full 50-gallon water heater weighs over 400 pounds, making it impossible to move safely until it is completely empty.
- Attach a standard garden hose to the drain valve located near the bottom of the water heater tank. Run the other end of the hose to a nearby floor drain, sump pump basin, or outdoors.
- Open a hot water faucet somewhere in your house (such as a kitchen or bathroom sink). This breaks the vacuum inside the plumbing system, allowing air into the lines so the tank can drain smoothly.
- Slowly open the drain valve on the water heater.
- Pro Tip: If the water stops draining or flows very slowly, sediment is likely clogging the valve. To clear it, briefly turn the cold water supply valve back on for a few seconds. This burst of pressurized water should break up the sediment block, allowing the tank to finish draining.
Step 3: Disconnecting and Removing the Old Unit
Once the tank is completely empty, you can safely disconnect the connections.
- Disconnect the electrical supply conduit from the top of the water heater. Unscrew the wire nuts and separate the home’s supply wires from the water heater leads.
- Disconnect the water supply lines. If you have flexible copper or stainless steel connectors, unscrew them using two wrenches (one to hold the tank nipple steady, and one to turn the connector nut). If your plumbing is hard-piped with rigid copper, use a tubing cutter to cut the pipes high enough to give you room to work when installing the new connections.
- Carefully tilt the empty water heater onto an appliance dolly. Secure it with straps and carefully wheel it out of the area. Have a helper assist you, as even empty tanks can be awkward and heavy.
Step 4: Installing and Connecting the New Water Heater
Now it is time to prep and position your new unit.
- Slide the new water heater into position. Use a level to ensure the unit sits perfectly vertical. If your floor is uneven, place plastic or metal shims under the feet of the tank to level it.
- Install the Temperature and Pressure (T&P) relief valve into the designated port on the side or top of the tank. Wrap the threads with 2 to 3 wraps of Teflon tape (wound clockwise) and tighten it securely. Attach a copper or CPVC discharge pipe to the T&P valve, routing it downward so it terminates within 6 inches of the floor.
- Install dielectric unions on the hot and cold water inlets. Dielectric unions are essential because they prevent galvanic corrosion, which occurs when two dissimilar metals (like copper plumbing and steel tank nipples) touch.
- Connect your water supply lines to the unions. Ensure the cold water line goes to the inlet marked “Cold” (which features an internal dip tube) and the hot line connects to the “Hot” outlet.
- CRITICAL STEP: Open the cold water supply valve to fill the tank. Keep a hot water faucet open somewhere in the house. You will hear air rushing out of the faucet. Once a steady, uninterrupted stream of water flows from the faucet, the water heater tank is completely full. Never turn the electrical breaker back on before the tank is 100% full. If you power up dry heating elements, they will burn out in seconds.
- Connect the electrical wiring. Attach the green ground wire to the green grounding screw, then connect the two hot wires from your house panel to the two hot leads on the water heater using wire nuts. Reinstall the junction box cover.
- Turn the electrical breaker back on at your main panel. It typically takes about 60 minutes for an electric water heater to fully heat a 40- or 50-gallon tank. Check all plumbing connections again for any slow drips or leaks.
DIY vs. Professional Installation: Costs, Permits, and Risks
While a DIY water heater replacement is highly rewarding and can save you money, it is not a project to take lightly. It requires intermediate plumbing and electrical skills, specialized tools, and a solid physical effort.
For homeowners who want code-compliant installation without the uncertainty of a DIY job, Daigle Plumbing, Heating & Cooling provides water heater installation and repair in Derry, NH for standard tank systems, tankless upgrades, and replacement planning throughout Southern New Hampshire.
Realistic Cost Considerations
To help you decide if DIY is the right route for your budget and comfort level, compare more than the upfront price of the equipment. A DIY installation may reduce labor costs, but you are still responsible for selecting the right unit, buying compatible materials, pulling any required permits, safely removing the old tank, and correcting any leaks or code issues that come up during installation.
Professional installation generally includes the unit, required materials, code-compliant setup, old-unit haul-away, and warranty support. The overall investment depends on the water heater type, capacity, site conditions, permit requirements, accessibility, and whether plumbing or electrical updates are needed.
While the upfront savings of a DIY install are appealing, working with a professional guarantees code compliance, fast completion, and absolute peace of mind. Homeowners comparing total value, warranty coverage, and timing can also use our expert-backed advice on how to save on water heater replacement before choosing the right path.
Codes, Permits, and Safety Hazards
Many homeowners do not realize that in most New Hampshire jurisdictions, including Derry, NH, and surrounding towns like Londonderry and Windham, NH, replacing a water heater legally requires a plumbing permit and a subsequent safety inspection.
Local building codes exist for your safety. For instance, codes dictate:
- The proper installation of a thermal expansion tank (required in closed plumbing systems to prevent pressure spikes).
- The correct routing of the T&P discharge tube to prevent severe scalding hazards.
- Proper electrical grounding to eliminate shock risks.
Failing to pull a permit or hiring an unlicensed individual can backfire. If an unpermitted DIY water heater leaks and causes major property damage, your homeowner’s insurance policy may deny the claim.
Additionally, planning your replacement during the winter months can be highly advantageous. Our article on why January is a great time to replace a water heater explains how off-season scheduling, comfort planning, and preventive replacement can help homeowners avoid emergency breakdowns.
Frequently Asked Questions about Replacing Water Heaters
How long does a typical electric water heater last?
A standard electric tank water heater lasts between 8 to 12 years. You can significantly extend this lifespan by performing simple annual maintenance, such as flushing the sediment out of the tank once a year and replacing the sacrificial anode rod every 3 to 5 years. The anode rod acts like a lightning rod for corrosion, rusting away so your steel tank doesn’t have to.
Can I replace a water heater myself without plumbing experience?
If you have zero plumbing or electrical experience, we strongly advise against a DIY installation. Working with 240-volt electricity carries a real risk of severe shock or electrocution if wired incorrectly. Additionally, a poorly sealed plumbing connection can lead to slow, hidden water leaks that cause structural wood rot and toxic mold growth over time.
What are the benefits of switching to a heat pump water heater?
Switching to a hybrid heat pump water heater offers major energy savings, often cutting water heating costs by up to 70%. In addition, these eco-friendly units may qualify for federal tax credits and local utility rebates that make the upgrade more affordable.
Conclusion
Replacing your water heater is a vital home improvement project that restores comfort, improves energy efficiency, and protects your home from catastrophic water damage. While a highly capable DIYer can tackle an electric water heater swap, the risks of dealing with high-voltage electricity, heavy tanks, and local code compliance lead many homeowners to seek professional help.
At Daigle Plumbing, Heating & Cooling, we have been serving Southern New Hampshire families for over 40 years. Whether you live in Derry, NH, Salem, NH, Manchester, NH, Nashua, NH, or any of our neighboring communities, our licensed and insured experts are ready to provide fast, reliable, and stress-free water heater replacements. We offer industry-leading warranties, flexible financing options, and a 100% satisfaction guarantee.
Ready to upgrade your home’s comfort? Don’t wait for a basement flood to force your hand. Contact our professional water heater technicians today to schedule your professional installation.