Identifying Common Warning Signs and System Failures
To fix a water pressure tank, start by draining the system to check and adjust the pre-charge air pressure so it sits exactly 2 PSI below the pressure switch cut-in setting. If the tank slowly loses air, replacing a worn Schrader valve core or resealing threaded fittings often solves the issue. However, if water squirts from the air valve, the internal bladder is ruptured, and the waterlogged tank must be replaced.
A failing pressure tank rarely quits without sending warning signals first. Because the tank acts as a buffer between the mechanical well pump and household fixtures, any loss in the tank’s buffering cushion immediately impacts how water moves through the home.
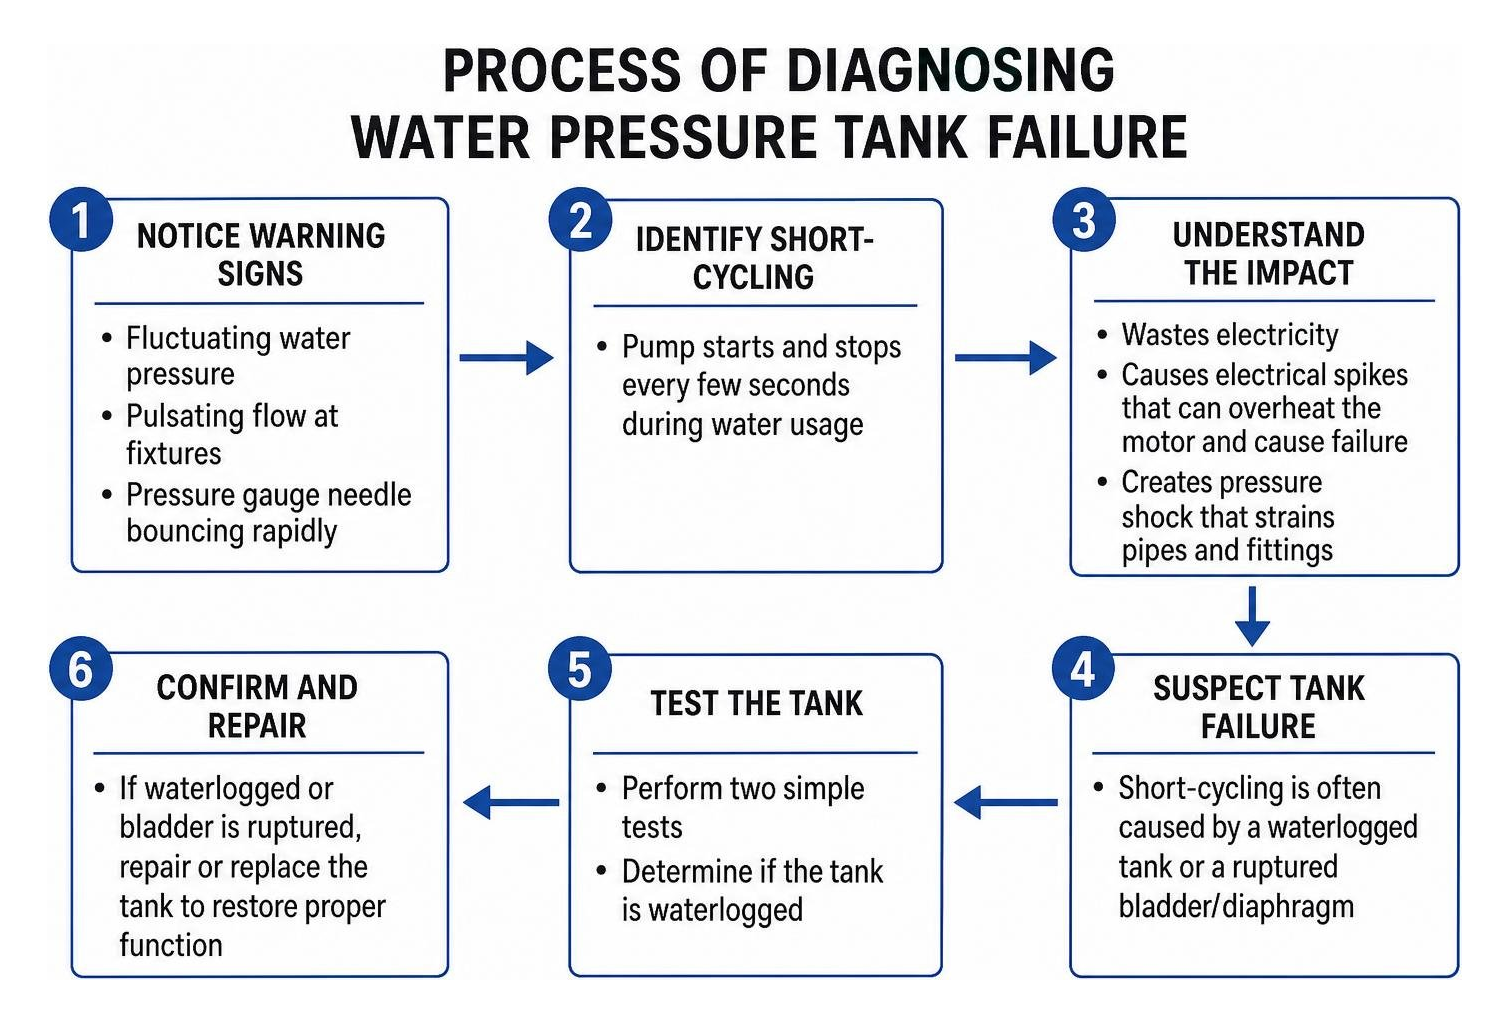
The most noticeable indicator is fluctuating water pressure. When you run a shower or use the kitchen sink, the stream might pulsate, cycling rapidly between a powerful spray and a weak trickle. If you watch the pressure gauge mounted on the tank manifold during this time, you will notice the needle bouncing rapidly between the cut-in and cut-out thresholds instead of rising and falling steadily.
This symptom, known as short-cycling, happens when the well pump starts and stops every few seconds during water usage. Frequent pump starts waste electricity and can overheat the pump motor windings, increasing the risk of premature motor failure.
Without a proper air cushion to absorb hydraulic spikes, the sudden start-and-stop cycles can loosen pipe fittings, shake water lines, and contribute to pipe failure. Homeowners who notice leaks or wall staining alongside pressure changes should know the signs of a burst pipe so they can limit water damage quickly.
Recurring pressure loss, cycling, or reduced flow can also point to pump or well issues beyond the tank. Our overview of common well problems and solutions explains what may be affecting the rest of the system.
Diagnosing a Waterlogged Tank and Ruptured Bladders
A tank becomes waterlogged when the internal air cushion is completely lost, filling the vessel entirely with water. In modern bladder or diaphragm tanks, this usually points to a torn or ruptured rubber barrier.
You can perform two simple tests to determine if your tank is waterlogged:
- The Tap Test: Take a metal tool or coin and gently tap the side of the tank body from top to bottom. A properly operating tank should sound hollow near the top, where the compressed air chamber sits, and produce a lower, dull thud toward the bottom half, where the water rests. If the entire tank produces a heavy, solid thud from top to bottom, the tank is full of water and has lost its air charge.
- The Schrader Valve Test: Modern tanks feature an air valve on top identical to the valve stem on a car tire. Remove the plastic dust cap and depress the center pin for half a second. If air hisses out, the bladder may still be intact. However, if water squirts out of the valve, water has migrated into the air chamber through a tear in the rubber membrane. Once water appears at the Schrader valve, the bladder is ruptured, and the tank cannot be repaired by simply adding air.
Step-by-Step Air Pressure Check and Calibration
If the Schrader valve test only releases air, your tank may simply suffer from low pre-charge pressure. An incorrect air charge can cause short-cycling even if the bladder is completely intact.
To safely check and calibrate the air charge, follow these steps:
- Cut the Electrical Power: Turn off the dedicated double-pole circuit breaker powering your well pump to prevent the pump from switching on during service.
- Depressurize the System: Attach a garden hose to the boiler drain valve on the tank tee manifold and run it to a floor drain or outside. Open the drain valve and open the nearest cold water faucet to break the vacuum. Allow the tank to empty completely until the pressure gauge reads 0 PSI and water ceases to flow.
- Inspect the Valve Stem: Clean any debris from the Schrader valve threads.
- Measure Current Air Pressure: Press a reliable digital tire pressure gauge firmly onto the Schrader valve. Digital gauges reading in 0.5 PSI increments offer better accuracy than mechanical pencil gauges.
- Calculate Target Pre-Charge: Determine your pressure switch settings. Common setups operate at 30/50 PSI or 40/60 PSI. The tank’s empty pre-charge air pressure must always be set exactly 2 PSI below the switch’s cut-in setting. For a 40/60 PSI switch, the cut-in is 40 PSI, so the target tank pressure is 38 PSI. For a 30/50 PSI switch, the target is 28 PSI.
- Adjust the Air Volume: If the pressure is low, attach a manual bicycle pump or portable air compressor to the valve and add air until the gauge reaches the exact target PSI. If the tank is over-pressurized, tap the valve core pin briefly to release excess air.
- Re-test and Restore: Check the pressure once more with your digital gauge. Close the drain valve, turn off open faucets, and switch the electrical breaker back on to refill the system.
Essential Steps for DIY Water Pressure Tank Repair
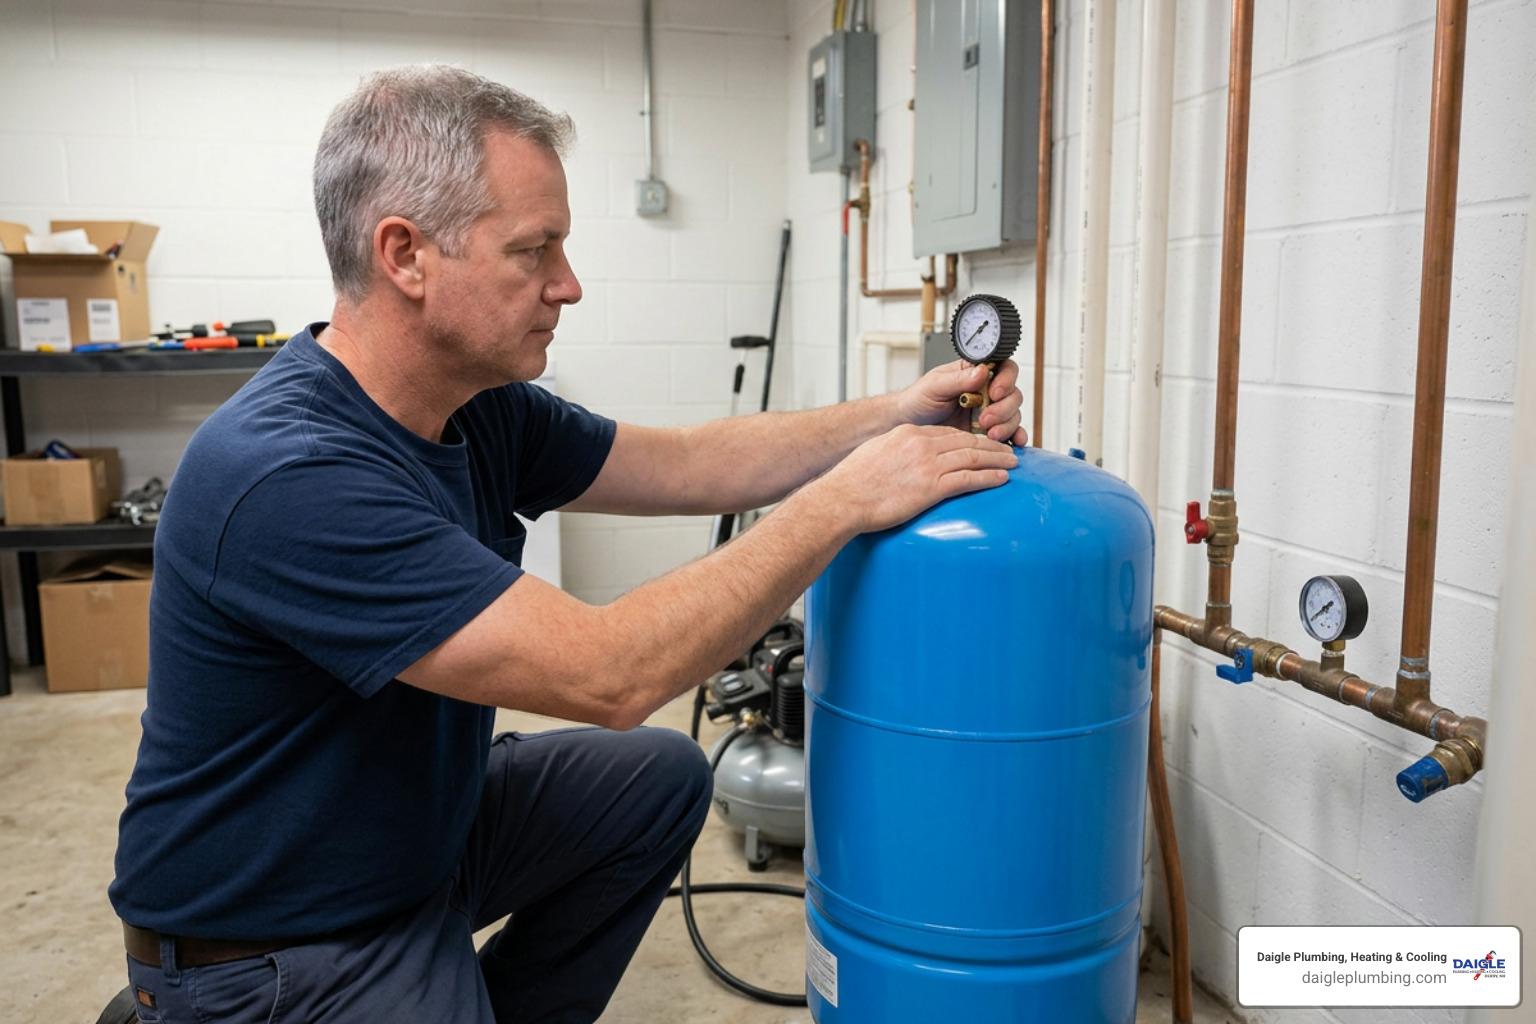
When the tank’s internal bladder is intact, minor leaks around fittings or through the valve stem can often be resolved with basic hand tools. Applying proper mechanical seals helps prevent recurring air loss and keeps the pump running smoothly.
One of the most common points of slow air loss is a failing Schrader valve core. If you notice the air pressure dropping slowly over several weeks without any water leaking out, the valve core may be worn or corroded.
To replace the core:
- Depressurize the tank and system completely.
- Use a standard four-way valve core removal tool to unscrew the old brass core counterclockwise from inside the stem.
- Thread a new, standard automotive-grade valve core into the stem and tighten it until snug.
- Pressurize the tank to the proper pre-charge specification.
- Mix a small amount of liquid dish soap with water and dab it over the valve opening. If bubbles form, the core is loose or improperly seated.
When working with threaded plumbing connections on the brass tank manifold, always clean the male threads thoroughly with a wire brush. Wrap the threads with 3 to 4 passes of industrial-grade PTFE thread tape in a clockwise direction, followed by a thin layer of pipe joint compound to create a watertight seal before rethreading connections.
If leaking fittings, corroded piping, or a damaged manifold make the repair more involved, Daigle Plumbing, Heating & Cooling can provide plumbing services in Derry and nearby communities to help restore the system safely.
Identifying Pressure Switch Failures During Water Pressure Tank Repair
Sometimes a pressure tank appears to be malfunctioning when the real issue is an electrical or mechanical fault in the pressure switch. The pressure switch monitors water pressure in the manifold and controls power to the well pump motor.
Inspect the pressure switch by turning off the power at the main breaker panel and removing the switch’s plastic protective cover. Look for the following problems:
- Pitted or Burnt Contacts: Electrical arcing over thousands of cycles leaves carbon buildup or scorch marks on the silver electrical contact points. If the contacts look burnt or welded together, the switch will fail to signal the pump reliably.
- Debris or Insect Intrusion: Small insects, such as spiders or ants, can get trapped between contact points, preventing electrical continuity.
- Clogged Pressure Port: The switch connects to the brass tank tee via a small 1/4-inch brass or galvanized nipple. Mineral scale, iron deposits, or sediment can clog this narrow pathway. When blocked, the switch cannot sense changes in water pressure, causing the pump to run continuously or fail to turn on.
If your switch shows signs of heavy corrosion or damaged contact points, cleaning is usually a short-term fix. Replacing the switch helps the pump cycle safely. These symptoms can overlap with the warning signs covered in our article on well pump repair issues.
Addressing Tank Shell Corrosion and Pinhole Leaks
Water quality, ambient humidity, and condensation can cause external rust on carbon steel pressure tanks, particularly along the bottom dome and welded seams. If you spot localized rust with a slight water weep, it indicates that the steel wall has thinned from the inside out or exterior condensation has eaten through the shell.
For minor surface pinholes, you can apply an emergency patch to maintain water service while arranging for a tank replacement:
- Isolate the tank and drain all water to eliminate internal pressure.
- Use 60 to 80-grit abrasive emery cloth to sand the area down to bare metal, extending at least two inches beyond the pinhole.
- Clean the metal surface using acetone or isopropyl alcohol to remove oil, dust, and rust particles.
- Knead a two-part, NSF/ANSI 61 certified potable-water epoxy putty until it displays a uniform color.
- Press the putty firmly over the leak point, feathering the edges outward to establish a secure bond with the surrounding metal.
- Allow the epoxy to cure fully, typically 24 hours at room temperature, before re-pressurizing the vessel.
Any epoxy patch on a pressurized residential well tank is strictly a temporary measure. Internal water pressure can eventually break the adhesive bond, so a permanent tank replacement should be scheduled promptly.
Step-by-Step Guide to Pressure Tank Replacement
Replacing a failed, waterlogged pressure tank involves basic plumbing and electrical safety procedures. Because waterlogged tanks can weigh anywhere from 100 to over 300 pounds when filled with trapped water, always take your time and plan each step carefully.
- Shut Off Power and Isolate the System: Turn off the circuit breaker supplying power to the well pump. Close the main water shut-off valve leading into the house to keep household lines primed.
- Drain the Failed Tank: Connect a hose to the tank drain valve and open it. If the tank is completely waterlogged, water may drain slowly because of an internal vacuum. You can carefully remove the pressure gauge or loosen the Schrader core to allow air in, helping water drain out.
- Disconnect Electrical Wiring: Label and disconnect the electrical wires running from the power panel and to the pump motor at the pressure switch.
- Disconnect Plumbing Unions: Use pipe wrenches to disconnect the plumbing union connecting the brass tank tee to the household distribution pipe. If the tank uses rigid piping without a union, cut the pipe with a pipe cutter, leaving sufficient clean pipe for a new union or coupling.
- Remove and Swap the Tank: Clear a path and carefully slide the old tank off its mounting pad. Position the new tank in place, ensuring the Schrader valve on top is easily accessible for future maintenance.
- Transfer or Install the Tank Tee: Thread a new brass tank cross manifold into the base of the replacement tank using PTFE tape and pipe compound. Reinstall the pressure relief valve, boiler drain valve, pressure gauge, and pressure switch into the designated manifold ports.
- Pre-Charge Before Filling: Check and adjust the tank’s pre-charge pressure while it is completely dry and empty. Set the air pressure exactly 2 PSI below your switch’s cut-in setting.
- Reattach Plumbing and Wiring: Reconnect the household piping union. Reconnect the electrical wiring to the pressure switch terminals, securing all ground wires properly.
- Pressurize and Inspect: Close the drain valve and restore electrical power. Allow the well pump to run until it reaches the cut-out pressure and shuts off automatically. Check every threaded fitting with soapy water to confirm there are no water or air leaks.
Regular well pump maintenance can help identify sediment buildup, switch problems, and pressure changes before they lead to a system failure.
For complete tank replacement and system diagnostics, Daigle Plumbing, Heating & Cooling provides well pump repair and replacement services that help match tank capacity, pump performance, and household water demand.
Preparing Tools and Setup for Water Pressure Tank Repair and Replacement
Gather the necessary tools before beginning your project to ensure a smooth installation:
- Two heavy-duty pipe wrenches, 14-inch and 18-inch, for leverage on threaded fittings
- Channel-lock pliers and an adjustable crescent wrench
- High-accuracy digital tire pressure gauge
- Manual tire pump or oil-less air compressor with air chuck
- Four-way Schrader valve core tool and replacement cores
- Industrial PTFE thread seal tape and NSF-certified pipe joint compound
- Brass tank tee manifold kit, complete with 1/4-inch pressure switch port and 3/4-inch drain port
- Tubing cutter or hacksaw for copper or PEX supply lines
- Standard slotted and Phillips screwdrivers, along with wire strippers
- Garden hose for system drainage
- Safety glasses and heavy work gloves
Proper Tank Sizing and Drawdown Calculations
Selecting an undersized pressure tank is a common DIY mistake. Tanks are rated by their total internal volume in gallons, but the usable water delivered between pump cycles is known as the drawdown capacity.
The maximum amount of water a bladder tank can supply is roughly 50% of its total volume. In standard operating conditions, you can expect about 30% to 35% of the total tank volume as usable drawdown. For example, a 50-gallon tank typically yields about 15 to 17 gallons of water before the pressure drops to the cut-in point and turns on the pump.
Pump manufacturers recommend that a well pump run for at least one full continuous minute every time it starts. Running for less than 60 seconds does not allow the motor to dissipate heat, which shortens its lifespan.
To calculate the proper tank size for your home:
- Determine your well pump’s flow rate in gallons per minute (GPM). This is usually listed on the well installation report or pump motor plate. Common residential ratings range from 7 to 15 GPM.
- Multiply the pump’s GPM by the desired runtime, at least 1.0 minute. A 10 GPM pump needs a minimum drawdown capacity of 10 gallons.
- Divide that required drawdown figure by the tank’s drawdown factor, typically 0.30 to 0.35 for a standard 40/60 PSI system.
Using this calculation, a 10 GPM pump requires a tank with a total capacity of at least 30 to 34 gallons. When in doubt, sizing up to a larger tank is often safer because it provides longer runtimes, fewer overall motor starts, and more stable household water pressure. A 40-gallon well pressure tank is a common baseline for small to medium homes.
Comparing Pressure Tank Types and Construction

Three primary pressure tank designs are found in residential plumbing systems:
- Galvanized Air-Over-Water (Captive-Air) Tanks: These older tanks have no physical barrier between the water and air. The air simply rests directly on top of the water. Because water absorbs air over time, these tanks require frequent manual draining or air-volume control valves to prevent waterlogging.
- Diaphragm Tanks: These tanks feature a flexible rubber diaphragm permanently bonded to the inner steel wall of the tank. Water fills the bottom section, while pre-charged air stays sealed above. The interior water chamber is lined with a protective polymer coating to prevent direct contact between water and steel.
- Bladder Tanks: These units use a balloon-like rubber bladder suspended inside the tank shell. Water enters the inside of the bladder, isolating it completely from the surrounding steel tank walls. In some commercial and premium residential models, the bladder can be replaced without removing the entire outer shell.
Bladder vs. Diaphragm Tanks
| Feature | Bladder Pressure Tank | Diaphragm Pressure Tank |
|---|---|---|
| Internal Design | Replaceable/drop-in balloon bladder | Permanently bonded flexible rubber sheet |
| Water Contact | Water remains entirely inside the rubber bladder | Water touches diaphragm and lined lower tank shell |
| Average Lifespan | 7 to 12 years (replaceable internal bladder) | 8 to 15 years (full vessel replacement required upon failure) |
| Sediment Tolerance | Moderate; sediment can settle at the bottom of the bladder | High; sediment discharges cleanly through bottom outlet |
| Serviceability | Bladder can occasionally be swapped on select models | Non-serviceable; unit must be replaced upon failure |
| Corrosion Risk | Minimal interior shell contact; external humidity remains a factor | High if internal polymer liner scratches or flakes off |
When to Call a Licensed Well and Plumbing Professional
While adjusting an air valve or replacing a pressure gauge are approachable DIY tasks, other pressure tank issues require professional plumbing and electrical skills.
You should reach out to a licensed professional if you encounter:
- Complex or Corroded Manifold Plumbing: Older galvanized piping that has rusted together can easily snap inside structural walls or fittings during disassembly, turning a simple repair into a major plumbing emergency.
- Electrical Panel and Wiring Issues: Diagnosing control boxes, 230-volt sub-panels, or failing pressure switches presents high-voltage shock hazards that should be handled by trained technicians.
- Deep-Well Check Valve Failures: If your tank repeatedly loses pressure while no faucets are running, the check valve down inside the well casing may be stuck open. This allows water to drain back into the ground and requires specialized pulling equipment to access.
- Persistent Low Water Yield: If a new tank fails to resolve pressure issues, your well pump may have worn impellers, an obstructed intake screen, or a declining well recovery rate.
If the problem extends beyond a safe DIY repair, the licensed team at Daigle Plumbing, Heating & Cooling can inspect the tank, pump controls, and related plumbing components to identify the source of the pressure loss.
Frequently Asked Questions About Pressure Tanks
Can I weld a pinhole leak in a water pressure tank?
No, you should never attempt to weld or braze a pinhole leak in a water pressure tank. Well tanks are pressurized vessels operating under substantial stress. Applying intense heat from a torch or welder alters the metallurgical properties of the thin sheet steel, creating weak spots around the weld seam that can rupture under normal household pressure. Pressure vessels operating above basic thresholds must adhere to ASME Section VIII safety standards. Welding compromises the tank’s structural rating, voiding manufacturer warranties and creating a dangerous safety hazard in your home.
What causes a well pump to click on and off rapidly?
Rapid clicking is usually the electrical contacts in your pressure switch cycling on and off because the pressure tank has become waterlogged. When a tank loses its internal air cushion, water cannot compress. The moment a household faucet opens, the pressure in the manifold drops to the cut-in point in less than a second, triggering the switch. As soon as the pump starts, water fills the rigid piping instantly, driving the pressure up to the cut-out limit in another second. This cycle repeats continuously, causing rapid clicking and putting severe thermal stress on your pump motor.
How long does a typical well pressure tank last?
Under normal operating conditions, a quality residential bladder or diaphragm pressure tank lasts between 7 and 15 years. However, several environmental factors can shorten that lifespan:
- Acidic Water Chemistry: Low pH water corrodes internal brass fittings and weakens protective tank linings.
- Abrasive Sediment: Fine sand or mineral grit entering from the well can wear down and puncture the flexible rubber bladder.
- Excessive Chlorine or Chemical Treatments: High chlorine levels dry out and degrade butyl rubber bladders over time, leading to premature cracking.
- High Humidity Locations: Tanks installed in damp basements, crawlspaces, or unconditioned outdoor pits are prone to external shell corrosion.
Conclusion
Keeping your well pressure tank in good condition is one of the easiest ways to protect your water pump and maintain steady water pressure throughout your home. Performing a simple annual check on your tank’s pre-charge pressure, testing the Schrader valve for signs of internal water leaks, and clearing sediment from the pressure switch line will help you catch small issues before they lead to pump failure.
If your pressure tank is waterlogged, heavily rusted, or cycling rapidly, the experienced team at Daigle Plumbing, Heating & Cooling is ready to help. Serving homeowners throughout Derry, NH, and surrounding communities including Salem, NH, Manchester, NH, Nashua, NH, Auburn, NH, Hampstead, NH, Merrimack, NH, Bedford, NH, Windham, NH, Hooksett, NH, Hudson, NH, and Londonderry, NH, we bring over 40 years of licensed expertise to keep your water running smoothly. Contact our professional well pressure tank technicians to schedule an inspection, adjust your system, or install a replacement tank.